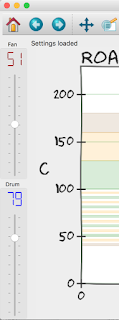
Now that Artisan can talk to the drive controllers, it is not only possible to read the drive speeds, but also to control the drive speeds. However, that needs some further configuration changes on the drive controllers as well as some additional setup on the Artisan side.
In a first step we enable external control via MODBUS on both frequency drive controllers. Then we have to configure Artisan to send appropriate MODBUS commands to change the speed. There is one draw back of this new setup that one has to be aware of. Those drive controllers can only take control either from the manual controls on the device or via remote MODBUS commands, but not both. Here we will reconfigure the controllers to give control to the externally connected computer and with this deactivating the manual dials that otherwise could be used to change the drive speeds.
Controller Setup
According to the Delta VFD-L short- and full user manual and , the parameter group 2 is responsible to configure the control options. The source of the frequency command, the one that regulates the drive speed, is configured via parameter 2-00 "Source of Frequency Command", which defaults to d3 "Master Frequency determined by Potentiometer on the digital keypad", manual control via the physical dial. We set it to d4 "Master Frequency operated by RS-485 serial communication interface", to give control to the RS485/MODBUS input.
We also want to be able to start and stop the drives via MODBUS commands from within Artisan. For this we need to reconfigure parameter 2-01 "Source of Operation Command". This one is set by Coffee-Tech Engineering to d1 "Controlled by the external terminals, keypad STOP enabled". This allows to start/stop the drives via the switch labeled "DRUM" on the front panel. We set this to d3 "Controlled by the RS-485 communication interface, keypad STOP enabled" to be able to start/stop the drives via buttons on the Artisan user interface.
Button Definitions
Artisan allows for user defined buttons that can not only register events, but also emit commands to connected devices. We want to define 4 buttons, an ON and an OFF button for each of our two drives.
We open the Events dialog (menu Config >> Events..) and add four new buttons as in the picture below. We have to select "Modbus Command" as action and put a corresponding write command in the documentation field. The first parameter of write indicates the MODBUS slaveID of the device that should receive the command (we selected 1 for the fan speed controller and 2 for the drum speed controller in the previous post). The second parameter is the register address for the parameter we want to set (here 8192 which corresponds to 2000H). The third parameter is the value. According to the manual, bits 0 and 1 are responsible for the drive control, with the bit string 01 (decimal 1) indicating Stop and the bit string 10 (decimal 2) indicating Run. So we set the command for "FAN\nON" to write(1,8192,2), that of "FAN\nOFF" to write(1,8192,1), that of "DRUM\nON" to write(2,8192,2) and that of "DRUM\nOFF" to write(2,8192,2).
With these definitions we can already start and stop the drives (press key b if the buttons are not yet visible). However, we want also to control their speed via sliders.
Slider Definitions
We need to define two custom sliders, that range from 0-100% and send out corresponding values in the range from 0-10.000 to register number 8193 (Freq. command register, 2001H). We tick two sliders active in the Sliders tab of the Events dialog (menu Config >> Events), select "Modbus Command" as action and put in corresponding write commands. For the fan slider we use write(1,8193,{}) and for the drum slider write(2,8193,{}). As with the write command we used in the custom button setup, the first parameter of the write command indicates the MODBUS slaveID of the receiver of the message, the second the MODBUS register we want to modify and the third command the new value we want to set.
Here we use the placeholder {} as value, which is substituted by Artisan using the sliders position (0-100%) on release. That value is then multiplied by the defined factor and the specified offset is added. As we have to send a value of 10.000 to indicate 100% speed, we set 100 as factor for both sliders. If your sliders are named differently and you cannot see a "Fan" nor a "Drum" slider here, you can rename the four events in the first tab of the Events Dialog named Config to your needs.

With those definition you should see on the left side of the Artisan main window the two sliders that you now can use to change the speed of the drives. As an extra effect of those definitions, Artisan automatically records a corresponding event along the temperature curves for each slider change.
Note, while the fan drive ranges from 0-100%, the drum drive ranges only from 0-70 with the indicated values roughly corresponding to the drums RPMs. Further, you can play with the offset and factor definition and arrange things such that the fan slider (still ranging from 0-100%) changes the fan speed only, e.g. from 40-80.
NOTE: Please, study the linked manuals of the devices to understand the implications of any modifications you undertake as well as possible. Remember that you yourself are responsible for making sure the modifications are understood correctly and carried out precisely with care and common sense. We prepared our posts as careful as possible, but do not take any responsibility for remaining errors, mistakes or bad consequences that may result from you modifying any device based on the information given here.


