
Artisan v2.4.6 introduces a new capability to estimate the energy consumption and CO2 emission for every batch roasted with Artisan. This first-of-the-kind calculator uses logged burner settings, roaster machine specific specification data and energy source information to provide a consistent and methodical view of the roast machine’s performance.
The coffee roasting industry needs to embrace the need for improvement. Roasting machine manufacturers need to be clear and transparent about how their equipment performs. Purchasers of roasting equipment must demand this for the industry to improve.
By estimating energy consumption the roastmaster can adapt her procedures to reduce the impact of a roast session. It is possible to make significant quantifiable improvement without having to purchase new equipment.
This article provides information about what the Energy Calculator does, how it operates and shows several examples of how to configure it and how to interpret the results. We hope you will find this adds valuable information to your roasting operation and that the Energy Calculator will help create awareness, dialog, and improvement by roastermasters throughout the industry.
How the Energy Calculator Works
The Artisan Energy Calculator provides estimates for energy consumption and CO2 emission across four phases of the roasting process, Pre-Heating at the start of the roast session, Between Batches (BBP), the Roast batch itself and the roaster Cooling at the end of the session.
The units used for the inputs and outputs can be selected. However, two key summary values are reported in fixed units to allow for consistent comparison across measurements. These two measures are Energy in kW per kg green coffee and CO2 in grams per kg green coffee.
The Energy Calculator uses a variety of inputs to make its calculations. Information about the roast machine and its energy loads is required. The largest energy load will be the primary gas burner or electric heating element. If there is an afterburner it too will be a significant energy load. Gas burners and afterburners generate CO2 from the burning of that gas. The Energy Calculator estimates the amount of CO2 generated based on the type of gas being used and the power rating of the burner.
Electric loads such as motors, fans and electric heating elements can contribute a surprising amount of CO2. This CO2 is not produced at the roaster but rather in the generation of the electricity. There are a range of sources of electricity from coal to hydro and wind. The Energy Calculator allows for setting the electric energy mix from 100% renewable sources (zero CO2) to 0% renewable (much CO2).
A total of up to four energy loads can be defined. The loads can be variable or continuous during the roast. Continuous loads are considered to be operating at 100% throughout the duration of the roast. The drum motor is an example of a continuous load. Continuous loads like motors and fans can be aggregated into a single load for convenience.
Gas, or heat settings are examples of a variable load. A load such as the "Burner" is linked to the event used to log the gas setting. Other variable loads, perhaps an afterburner, can each be linked to a logged event. Some roasters report heat while others report gas pressure. The Energy Calculator can optionally translate gas pressure readings into heat energy.
Sometimes roastmasters choose to log variable loads in some other unit and not as a percent value. Consider gas pressure readings that might be logged as kPa values. The Energy Calculator allows for translating these values into percent of maximum so the roastmaster does not have to change their logging methods to take full advantage of the energy calculation.
The Energy Calculator operates across four phases of roaster machine operation. These phases are Pre-Heating, Between Batches, the Roast and end of session roaster Cooling. The Pre-Heating and Between Batches phases can be significant energy consumers. By evaluating them the roastmaster can adjust her routine to reduce energy consumption where it is not productive. Normally the heat is off during cooling but the motors and fans are still running and may thus be included in the energy totals.
Artisan provides assistance in determining the configuration values to use for measuring consumption during the Pre-Heating, Between Batches and Cooling phases. The roastmaster can record one or more of these phases in isolation or in combination with a roast. It is easy with Artisan, press START at the beginning of roaster pre-heating and either press STOP at the end of the pre-heat or enter CHARGE as normal to capture the roast. Similar methods can be used to capture between batches or cooling. From this profile the Energy Calculator is able to autofill the appropriate fields in the Protocols setup. Alternately the roastmaster may input her own estimate or use a percentage for the energy and duration fields.
Between Batches energy, when configured, will be added to every roast. Pre-heating and Cooling will be added to only the first roast of the session. Why is cooling added to the first roast? Applying the Pre-heating and Cooling energies to the first roast keeps these overheads in one place. Since there could be any number of roasts in a session the last roast won't have a consistent batch number to look up later.
Sometimes a between batch routine will be included in the pre-heating energy. To avoid double counting, there is an option to not add the separately defined Between Batches energy to this first roast.
The Artisan Energy Calculator provides the roastmaster with a way to approximate energy use and CO2 production. However, there is no claim that the values calculated are complete or exact in any respect. Please read the Caveats and Limitations section below for additional information.
How to Use the Energy Calculator
To use the Energy Calculator effectively you must first enter some key parameters. Artisan makes it easy but some work on your part will be necessary. Details for each of these steps will be shown in the examples below.
(1) Locate the ratings for the roaster’s energy loads. These include the primary gas burner or electric heater, an afterburner if one is used, and electric loads like motors and fans. The largest load will be the heat source. This information should be available from your roaster manufacturer. If it is not available a reasonable, but certainly not exact, estimate can be found by looking up your roaster’s capacity in this table.
(2) Setup Artisan to use events to record variable loads such as gas or heat settings. For instructions how to setup events see How do I record my gas and air changes?
(3) Setup the Artisan Roast Properties » Energy » Load sub-tab to include the primary loads. Click Save Defaults to be able to restore these settings later.
(4) Save your roaster settings to a file using Help » Save settings.
At this point you will be able to calculate basic energy consumption and emission from individual roasts. Example 1 demonstrates these steps.
To expand the calculation to evaluate Pre-heating, Between Batches and Cooling Protocols these additional configuration steps are required. See Examples 2, 3 and 4.
(5) Make profile recordings for Artisan to use Protocol measurements.
(6) Complete the Artisan Roast Properties » Energy » Protocols sub-tab using the profile(s) recorded above. Click Save as Defaults to be able to restore these settings later.
(7) Finalize any continuous loads and other settings on the Loads and Protocols sub-tabs. Click Save as Defaults to be able to restore these settings later.
(8) Save your roaster settings to a file using Help » Save settings.
You may download a zip file containing Artisan profiles for each of the examples below. Examples 1 through 4 share a common settings file. Example 5 has its own unique settings file. Save your own settings to a file first so you can restore them later (menu Help » Save Settings). Then load the settings file for the example (menu Help » Load Settings). Download EnergyExamples.zip.
Example 1 – The Basics
Let’s look at a simple example to see how to get started with the Energy Calculator. Open the Energy tab of Roast Properties (menu Roast » Roast Properties » Energy tab). From here click the Loads sub-tab. The load information is entered here as shown in the image below. Once these values are input we want to click the Save Defaults button so they can be recalled for new profiles or if they are ever overwritten, such as after loading a profile that has different energy data stored in it.
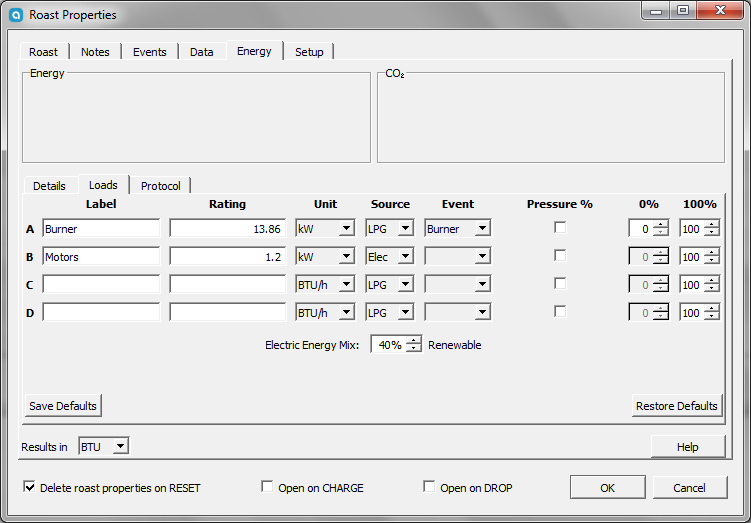
The Label field can be any text desired. If left blank the row label, “A”, “B”, ”C” or “D” will be used in its place.
Rating is the value for the power rating of the load using a dot as decimal separator as in other places of the app.
Unit should match the power rating. It can be “BTU/h”, “kJ/h”, “kCal/h”, “kW” or “hp”.
Source can be any of “LPG” for propane or liquefied petroleum gas, “NG” for natural gas or “Elec” for electricity. Sorry, we don't support wood fired roasters (yet).
Event ties the load to a recorded Artisan event. This example identifies Row A as being tied to the “Burner” event. When left blank, as in Row B, the calculator assumes the load is energized at 100% of the Rating value.
Pressure % should be ticked when gas pressure readings are taken from a pressure gauge. It should be unticked for electric roasters and for gas roasters that have a digital display, often labeled burner power or burner output.
0% / 100% sets the range for the load’s values to be interpreted as 0% to 100%. Normally a 0 value entered would correspond to 0%. A 100% value however may not correspond to an entry of 100. If you record burner settings as kPa instead of % then the 100% value could be a number other than 100. An example of how to use this value is shown in Example 5.
Electric Energy Mix approximates the percentage of electricity that comes from renewable sources.
For this roaster we entered the load information from the manufacturer's data sheet.

At this time we have not entered any information on the Protocol sub-tab.
These Protocol fields are very important to the Energy Calculator. Pre-heating and Between Batches can be significant contributors to the energy total. They represent where roastmasters have the easiest opportunity to reduce their carbon footprint without buying new equipment. Shortening Pre-Heating by 10 minutes, or shortening Between batches by one minute can have a dramatic affect on the consumption and emission per kg of green coffee. We'll learn how to use these in the additional examples below.
For this basic example we will leave these fields blank.

Click OK to save the settings and close the Roast Properties dialog.
Next we load a profile showing the burner settings used during the roast.

For information on how to make special event annotations like those in the graph see Special Event Annotations and QSG: Events.
Now return to the Energy Tab in Roast Properties (menu Roast » Roast Properties » Energy tab » Details sub-tab).

The energy unit used for this example is BTU, however it can be chosen using the Results in pull down at the lower left in the Energy tab.
Let’s look at the information available on this page starting with the Energy summary at the top left.

We see that the total energy used by this roast is 3345 BTU. The Preheat and BBP energies are both zero because no entries have been made on the Protocols sub-tab. At the bottom the energy for this roast is shown per kg of green coffee. This value is always shown in the unit watt-hours per kg. For this value to be shown there must be a green coffee weight entered in the Roast Properties » Roast tab.
This roast used 3 kg of green coffee, so the 3345 BTU was divided by 3 kg and converted to Wh/kg to produce the value 327 Wh per kg green coffee.

Now let’s look at the right hand side of the summary where an estimate for CO2 emissions is provided.

We see that this roast was estimated to have produced 211g CO2, or 70.35g per kg of green coffee. There are many factors that feed this estimate of CO2 produced. They included the energy sources set in the Loads configuration. When the energy source is “Elec”, or electricity, the CO2 produced comes not from heating element on the roaster but rather from the generating source of the electricity. The CO2 produced varies dramatically for electricity generated from coal to electricity generated by wind. The Electric Energy Mix…% Renewable field allows for adjusting between these two extremes. This example selected 40% Renewable.
The Detail data table shows granular information of the energy and CO2 calculations.

Each row in the table is used to sum up to the totals shown in the summary. The first row is the amount of electricity used to operate the motors. Since the motors were setup without being tied to an event they are considered to run at 100% power throughout the roast. Thus the motors are a “continuous” kind of load. The duration of this roast was 9:53 so the energy consumed by the motors totals 0.198 BTU.
The rest of the rows for this example are calculated from the Burner event values. Row 2 shows the burner set to 1% during the 48 second soak period following the CHARGE event. Then the burner was increased to 70% for the next 2:16. Each row corresponds to a change in the burner setting with a duration running until the next change, or the DROP event.
Example 2 – Between Batches Protocol
Most roastmasters using drum roasters employ between batch protocols to insure the roaster’s thermal energy is consistent at the start of every batch. A between batch protocol can be a significant contributor to the overall energy consumption and CO2 production of each roast batch.
Here again is the Loads sub-tab used for this example, however notice that we changed the Results in unit to kWh. The difference will become apparent once there are results to show.

The Protocols sub-tab allows entry of information about the pre-heating, between batches, and roaster cooling phases of a roasting session. The information entered on the Protocols sub-tab can be used for future roasts by clicking the Save Defaults button. Do not forget to save your settings, for safe keeping, to a file by using menu Help » Save Settings.
This example will focus on the between batches protocol. First we need to discuss some important aspects of the Energy Protocols sub-tab. There are columns for each of the four energy loads as defined on the Loads sub-tab. If a Label was entered for the load it will be used as the column title. Otherwise a letter A-D will be used as the identifier.
There are two ways to enter load information here. An estimate of the percentage of power over some duration is one way to enter energy information. If the burner was run at an average 15% for 10:00 the entry would look as shown below.

Load energy values can also be entered as a fixed energy number. The entry below indicates the between batches protocol consumes a fixed 0.17 kWh. There is no time entry for the between batch protocol because it is not needed. This configuration is a fixed energy consumption for the burner when executing a between batch protocol.

Where does this 0.17 kWh energy information come from? It can come from an estimate if you are very familiar with thermal energy calculations. Most of us do not have the knowledge to do this.
Fortunately, Artisan has a built in tool to measure these values directly from a profile. First you will need to create a profile that includes the between batches protocol.
Start recording your roast profile immediately after the end of the previous roast. Hit START as soon as the previous roast is complete and the previous profile is saved to a file (Autosave can do this without manual intervention, see also). Let Artisan run as normal through the between batches protocol and the roast that comes after. Be sure to record your gas settings during the between batches protocol and enter CHARGE and DROP events as normal..
If you normally use Auto CHARGE (menu Config » Events » Config tab, Auto CHARGE) it is recommended to untick it and manually set CHARGE for this roast. The Auto CHARGE feature looks for a rapid drop in BT and can be fooled by the BT drop that is a part of the between batches protocol.
Below is the captured profile. The between batch protocol is on the left. In the middle is the CHARGE event and the roast is on the right ending with a DROP event. This was a somewhat long between batch protocol of approximately 10:00. Could there be an opportunity to save energy and to speed it up?

When trying this yourself, if you do not see the curve lines before CHARGE check the status of the Display Filter (Menu Config » Curves » Filter tab). Insure that Display Full is ticked.
Let's go back now to the Protocols setup page (menu Roast » Roast Properties » Energy tab » Protocols sub-tab). There we click the button with three dots at the end of the Between Batches row.

Artisan has measured the between batches energy by using the Burner event values from the very beginning of the profile until the CHARGE event. Artisan calculates this energy using the Burner settings logged in the profile and the Burner load set on the Loads sub-tab. The motors cannot be measured this way because they are continuous loads with no event information. Load C and Load D are not defined on the Loads tab so not value is calculated for them. We will estimate the motors in a moment.
Clicking Apply writes the values shown into the Between Batches fields. In this case the Duration of Between Batches and the value for the Burner energy are written. If a value was previously set for the Burner it will be overwritten. Fields where no value was calculated will not be overwritten.

The motors run continuously between the batches so we need to make an entry to reflect them running at 100%.

With Burner and Motors values and the Duration entered for the Between Batches Protocol we can now click Save Defaults to store them when needed to recall later. Then click the Details sub-tab to see the new results for this profile.

In the details table we notice two entries for BBP. There is a measured value for the Burner and a % value for the Motors.
We can also see that the between batch protocol accounts for almost a third of the total energy consumed and CO2 produced. There is a true opportunity for the roastmaster to make improvement!
Example 3 – Pre-Heating Protocol
So far we have made settings for the roaster’s loads to calculate the energy consumed by a roast and we also accounted for the between batch energy use. Now we need to provide settings for the roaster Pre-Heating protocol.
A profile must be captured that includes the entire pre-heating process, similar to the way a profile was recorded to allow Artisan to calculate the Between Batches energy. START an Artisan profile recording right as the roaster is turned on to start heating. Record each of the gas (or electric burner) changes during the pre-heating.
When the pre-heating is complete there are two choices. STOP and save the pre-heating profile or continue on without stopping Artisan and record the first roast of the day as normal including CHARGE and DROP events. The steps below will work for either choice.
This example includes the pre-heating followed by a between batches protocol and then a normal roast.

When trying this yourself, if you do not see the curve lines before CHARGE check the status of the Display Filter (menu Config » Curves » Filter tab). Insure that Display Full is ticked.
With this profile open we go back to the Protocols setup page (menu Roast » Roast Properties » Energy tab » Protocols sub-tab) and click the three dot button at the end of the Pre-Heating row.

Click Apply.

The profile used in this example includes the BBP energy between the end of pre-heating and before the roast starts. We don't want to double count the BBP energy by also including the usual Between Batches energy we defined earlier in Example 2. To prevent this we must untick the Between Batches after Pre-Heating box. This setting applies only to the first roast of the day. If the pre-heating profile was captured in isolation, without including a BBP, ticking this box would add the normal Between batches to the first roast of the day.
The Pre-Heating Duration of 56:23 was autofilled as well. This is useful for the motors entry whose manual input should be "100%".


Notice that the batch number is indicated in the lower right corner of the Details table. The roast is "Batch #1" so the Pre-Heating and Cooling (not yet configured for this example) energies will be included in the summary totals. Thus the energy per kg green coffee and CO2 per kg green coffee are much higher for this batch.
Example 4 – Cooling Protocol
The Cooling protocol we are concerned with here is the roaster cooling at the end of the roasting session. Bean cooling at the end of a roast should be accounted for in the Between Batches Protocol where it is necessary.
This profile captured the last roast of the day. It has been edited to appear as if it is the first roast of the day so the Cooling energies can be observed. Recall that only the first roast of the day will include the energies from Pre-Heating and Cooling protocols.
Artisan can make the calculated entries from a single profile that records the Pre-Heating protocol, a normal roast, and then the Cooling protocol. However, we don’t recommend heating and cooling the roaster solely for this purpose. To do so would be wasteful.

When trying this yourself, if you do not see the curve lines after DROP check the status of the Display Filter (menu Config » Curves » Filter tab). Insure that Display Full is ticked.
This example builds on the same energy configuration developed in the previous examples.

This same procedure used in Example 3 is repeated now for Cooling. Since the Burner is off and only the motors are running during the cooling period the three dots button shows no energy for this profile. The Duration is calculated and autofilled. We need only now to enter the Motors continuous energy of 100%.
Below is the completed Protocols sub-tab for this roaster. The Save Defaults button should be pressed before clicking OK. Then the complete settings should be saved to a file for safe keeping using menu Help » Save Settings.

Example 5 – Logging Gas Pressure Gauge Readings
This example will demonstrate how to use logs where a pressure reading was recorded with the Energy Calculator.
Caution: Don't be confused! This example was prepared on a different roaster and is using an Energy configuration different from the previous examples.
On this roaster we log readings taken directly from a pressure gauge in the gas line feeding the burner. The gauge reads in kPa. The pressure readings are entered into Artisan as 100 times the value indicated on the gauge. The value is multiplied by 100 because the direct kPa readings are small. They range from 0 to 3 and Artisan only allows whole number inputs to the events. By multiplying by 100 we can enter the values 0 to 300, thus a kPa reading of 2.5 would be entered as 250.
Here is a profile showing the kPa reading on the event labeled Gas.

Though the kPa reading are recorded as 100x the actual value, notice the annotations show the original reading. This is because we used this string in the Event Annotations "Gas ~E/100 kPa". For more information see Special Event Annotations and QSG: Events.
So far, these examples have assumed the Burner reading represent heat energy from 0 to 100% of the burner rating. How can the Energy Calculator interpret these kPa readings to determine the percentage of heat applied? Let's look at the Loads page, which is configured for this roaster (menu Roast » Roast Properties » Energy tab » Loads sub-tab).

There are two significant things to note in this setup. The first is that the "Pressure %" box is checked. This tells the Energy Calculator that the readings come from a pressure gauge and therefore represents gas pressure not burner power. The Energy Calculator internally uses Bernouli's equation to relate gas pressure to burner power when calculating the energy consumption..
Next is the setting for the Burner in the "100%" column. Recall that the 100% Gas pressure is 3 kPa, which is stored as the number 300 in the Gas event (3 kPa x 100). Thus 300 is the 100% value. By entering 300 here Energy Calculator knows how to interpret all the logged gas pressure events. For instance, 0.6 kPa is stored as 60, which is interpreted as 20% pressure.

Now we are able to use the Energy calculator with old and new profiles that have stored the gas settings as a number in units rather as a percentage.
Wrap up
The Artisan Energy Calculator is a powerful tool that can provide insight into the energy use and carbon footprint of your roasting operation. This is a first of it kind endeavor that we believe is very important. We want to hear your feedback, questions, ideas and experiences using it.
Caveats and limitations
The Artisan Energy Calculator depends on information about the roast machine and energy sources as well as logged heat settings data to provide its estimates for energy consumption and CO2 emission. Its results shall be considered approximation only and shall not relied upon as being exact or complete.
- The calculated energy consumption and emission values are estimated using the load data for the burners/heaters and fans/motors. These load values may not be accurate which will cause the calculated values to be inaccurate.
- The CO2 released from the coffee being roasted is not included.
- CO2 generated from the production and transportation of gas is not included.
- The CO2 emission for electricity generation has regional variances that are not accounted for at this time.
- Other emissions such as CO, NOX, Other PPM are not considered at this time.
Happy Roasting!
Dave and Marko
Top photo by Kindel Media from Pexels